
For the past few months I’ve toyed with the idea of expanding my blog to include some of my creative projects. One of the sticking points that I kept coming back to was that my blog was originally suppose consist entirely of book reviews, as such, would I be diluting my original premise by including other aspects of my life, e.g., travel, beekeeping, and now DIY? Due to the success of branching out into travel, I’ve decided to start including some of the projects I’ve most enjoyed figuring out. Most of the projects that I undertake consist of me figuring things out as I go, with the help of many other bloggers and tutorials that I will recognize throughout the instructions.
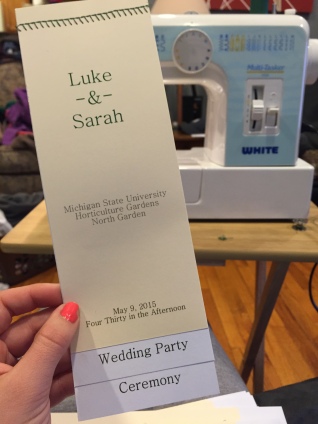
The first project I’ll detail are my wedding programs, which were one of my favorite tasks I undertook during my wedding planning. As the wedding drew near, with all of the main details already planned, I realized that I hadn’t even begin to think about the programs. My initial opinion was that programs were a waste due to most guests ignoring or throwing away the scrap of paper immediately following the ceremony. As such, my plan was to spend little to no money on the programs by using materials I already had on hand. As with many of the details regarding my wedding, I wanted the finished product to be unique and have my own personal twist. My initial idea involved something similar to these two beautiful programs, e.g, petal fan 1, petal fan 2. I soon disregarded this style after coming across the layered format e.g., Example 1, Example 2, however most of the examples I stumbled across in this layout were bound by a ribbon, which I was not necessarily a fan. Inspiration struck when I found this image of a beautifully machine stitched wedding program, specifically the unique binding. As the pieces came together, I knew I wanted to make a three layer, cardstock wedding program using paper left over from making my DIY wedding invitations, and have the binding be machine stitched. My next question involved the quandary, can you machine stitch cardstock? After a bit of Googling, I came across this wonderful tutorial, which I loosely followed, but gave me the encouragement needed that the design I had dreamt up was indeed possible. I fully recommend using the aforementioned tutorial instead of mine as a base point if you want to tackle this fun idea. Let it be said that I am not proficient at sewing, however I have a general knowledge from observing my Grandma for years and a sewing machine from one of my many short lived and subsequently discarded hobby phases. I have faith ANYONE can do this project! This was the perfect project because I used materials I already had on hand therefore I didn’t spend a penny on my final wedding programs.
Items:
- Cardstock paper already printed and cut to size
- Scissors
- Sewing machine
Steps:
- You should already have your designed, printed and cut your program pages to size. The cutting step was by far the most time consuming aspect of this project. With regard to the basic text layout, I have access to design software in my chemistry lab, allowing me to personally create the text design, but even widely available programs such as PowerPoint give everyone and anyone the opportunity and tools to create your own unique designs.
- After setting up your sewing machine, it is time to practice on scrap cardstock to ensure tension and settings are correct. I used three layers of cardstock for my program so I practiced with the corresponding paper layers. This is the simultaneously fun and frustrating aspect of the project. This is where you get to play with the many, many different stitching types to find the perfect stitch, e.g., zigzag, straight stitch, overcasting, to suit your style or tastes. Personally, I ended up falling in love with the overcasting stitch. This is also where the frustration aspect also comes into play as the initial thread I used to practice was polyester and worked perfectly, however when I switched to the green thread I wanted to use the thread disintegrated as it was stitched. After some research, I realized the thread in question was cotton, so I promptly switched back to a polyester green, problem solved.
- Upon choosing your stitch style and sufficient practice it is time to bind your programs. After stitching the binding I would keep the thread intact with several inches between programs and feed the following one through. I would typically sew twenty programs before stopping to cut the connecting threads. Here is another aspect that you can make your own by perhaps leaving a little bit of thread hanging on both side, maybe knotting the ends and cutting the thread flush with the cardstock. Whatever satisfies your creative eye!

wow i love this! it’s so cute and original
LikeLiked by 1 person
Thank you Mia! It was a really easy project too for someone with minimal sewing experience.
LikeLiked by 1 person
that would be me! 😂 i hardly ever sew but i really want to…
LikeLiked by 1 person
I am glad that you are branching out into other areas, otherwise I would not have known about your other amazing talents!
LikeLiked by 1 person
You are too kind! Thank you!
LikeLiked by 1 person
Thanks for this! I’ll keep that in mind with all my wedding planning this year! Please do expand the blog with crafty things. I still mainly do book reviews but I love doing decor and DIY posts and many others! 😊
LikeLiked by 1 person
Thank you! Then next couple of projects I’ll be posting are ones from my wedding! Wedding planning is so much fun! Especially the details! Congratulations!
LikeLiked by 1 person
Oh good, I can’t wait to see! I’ve started a little bit, I’m just trying to find a venue and set a date right now but I can’t wait to get to the details! Thank you so much! I’m sure I’ll be posting lots of wedding stuff too!😊
LikeLiked by 1 person
Very impressive! And beautiful!
LikeLiked by 1 person
Thank you! Thank you! It was a fun project to work on!
LikeLike
I love the idea of stitched invitations as well as DIY or crafty posts. I’ve thought about doing something similar on my own blog but have had some of the same concerns.
LikeLiked by 1 person
Thanks Katy! You should totally try expanding! I’m had such a better response than I’d expected that I’m sure yours would have a similar reaction!
LikeLike
I love that you branched out past book reviews! It’s great to learn a little bit about people’s other interests and hobbies, since it gives more context about the books they enjoy as well! Also – this is a really cool diy project.
LikeLiked by 1 person
Thank you for the kind words Daniella! I have a few more ideas for DIY posts that I’ll have to put together. 😀
LikeLike
HI, just wanted to let you know that I love your blog and nominated you for two awards! You can check out the details for each at http://invisible-no-more.com/2017/01/08/liebster-award-2017 and http://invisible-no-more.com/2017/01/08/and-the-good-news-just-keeps-on-coming
Thanks for all the you do!
LikeLiked by 1 person
I visited your blog to check at your book reviews, but was drawn to this post. You’re programs are adorable. I don’t know how to sew and I’m not particularly crafty, but if I was getting married (currently happily married), I would have definitely paid to have someone create these for me. So cute.
LikeLiked by 1 person
Thank you Karen! You are too kind! I’m really glad you enjoyed my little project. It was one of my favorite of the wedding!
LikeLiked by 1 person
Wow Great job !!! And looks amazing
LikeLiked by 1 person
Wow! Love that I came across this!
LikeLiked by 1 person
Thanks Blair! I’m glad you liked my little wedding program project! 😀
LikeLiked by 1 person
Looks great! So unique and creative, what a great idea! Thanks for sharing!
LikeLiked by 1 person
Thank you! Thank you! I’m glad you liked my project!
LikeLiked by 1 person
Ooh! My cousin’s getting married the day after tomorrow and I really really wish I’d seen this sooner! This would make for such a beautiful and quirky wedding invitation card or a manual of the rituals of Hindu Wedding Ceremonies! Never mind, though. Maybe after a decade or so I’ll use this idea for myself 😉
LikeLiked by 1 person
Thank you! I’m so happy you liked this little project. It was a fun and fairly easy detail to add to my wedding. I hope you had a wonderful time at your cousin’s wedding! ❤
LikeLiked by 1 person
I totally did! I was the bridesmaid equivalent of a Hindu Wedding, you see. And that guarantees fun 😉
LikeLiked by 1 person